
이 글은 가상 메모리를 알아보는 간단한 연재글의 첫 글입니다. 이 과정은 약간의 CS(computer science) 지식을 습득하는 것이 목표입니다, 하지만 좀 다른 방식으로 말이죠.
들어가기 전에:
이 글은 Holberton school에서 연재되고 있는 Hack The Virtual Memory의 번역본입니다.
가장 먼저 우리는 /proc를 통해 작동중인 프로세스의 가상 메모리에서 ASCII 문자열을 찾고 수정해보려 합니다.
환경
모든 스크립트와 프로그램은 다음 환경에서 테스트됐습니다:
- Ubuntu 14.04 LTS
- Linux ubuntu 4.4.0-31-generic #50~14.04.1-Ubuntu SMP Wed Jul 13 01:07:32 UTC 2016 x86_64 x86_64 x86_64 GNU/Linux
- gcc
- gcc (Ubuntu 4.8.4-2ubuntu1~14.04.3) 4.8.4
- Python 3
- Python 3.4.3 (default, Nov 17 2016, 01:08:31)
- [GCC 4.8.4] on linux
필요한 준비물
이 글을 완전히 습득하기 위해 이러한 것들을 알고 있어야 합니다:
- C 프로그래밍 언어 기초
- 약간의 Python 지식
- 아주 간략한 리눅스 파일시스템과 셸에 대한 이해
가상 메모리
컴퓨터에서 가상 메모리란 하드웨어와 소프트웨어 모두를 이용한 메모리 관리 기술입니다. 가상 메모리는 가상 메모리 주소(virtual addresses)를 실제 컴퓨터의 물리 메모리(physical addresses)에 연결하는 역할을 합니다. 주 공간(프로세스 또는 작업)에서는 연속적인 주소 공간 또는 연속적인 세그먼트의 컬렉션으로 나타납니다. OS는 가상 주소 공간과 실제 할당된 메모리를 가상 메모리로 할당하는 역할을 합니다. MMU(메모리 관리 유닛)이라 불리는 CPU에 있는 주소 변환 하드웨어는 자동으로 가상 주소를 실제 주소로 변환합니다. 이 과정을 통해 OS 내의 소프트웨어는 이런 기능을 활용해 실제 물리 메모리 공간보다 더 많은 메모리 공간을 사용할 수 있게 되었습니다.
가상 메모리의 가장 큰 효과는 다음과 같습니다:
- 공유해서 사용하는 메모리 공간을 관리할 수 있음
- 독립적인 메모리 공간 할당으로 보안이 강화됨
- 실제 물리 메모리보다 더 많은 메모리를 사용할 수 있음 (페이징 기술)
가상 메모리에 대해 더 자세한 사항은 위키백과에서 확인하시면 됩니다.
2번째 챕터에서 우리는 좀 더 자세히 가상 메모리에 대해 알아보고 내부가 어떻게 구성돼있는지를 알아볼 예정입니다. 지금 당장은, 여기 당신이 글을 읽기전에 꼭 알아야할 몇가지 사항이 있습니다:
- 각각의 프로세스는 자기 자신만의 가상 메모리를 갖습니다.
- 가상 메모리의 공간은 시스템 아키텍쳐에 따라 다릅니다.
- 모든 OS는 가상 메모리를 다루는 방법이 서로 다릅니다, 하지만 최근 OS들에 한해서 한 프로세서의 가상 메모리는 다음과 같이 생겼습니다:
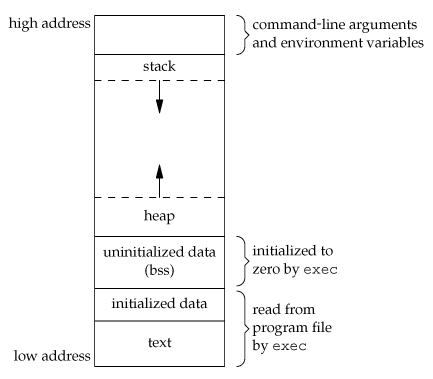
high 메모리 주소에서 우리는 다음과 같은 것을 확인할 수 있습니다(더 많은 것들이 있지만 이 글에서 다루지는 않습니다):
- 명령행 인자(command line arguments)와 환경변수 값들(environment variables)
- 아래 방향으로 점점 커지는 stack 공간. 이는 직관적인 구조로 보이지는 않지만 이 방법이 바로 가상 메모리 내에 stack이 구현된 방법입니다.
low 메모리 주소에서 우리는 다음과 같은 것을 확인할 수 있습니다:
- 실행 파일 (실제로는 이렇게 간단히 설명하는 것보다 훨씬 복잡하지만 이 글의 나머지를 이해하는데 이정도만 알아도 충분합니다)
- 위쪽 방향으로 점점 커지는 heap 공간
heap은 동적으로 할당되는 메모리의 한 부분입니다. (예: malloc으로 할당되는 메모리를 포함함)
또한, 가상 메모리는 RAM과 동일하지 않다는 것을 꼭 알아두시기 바랍니다.
C 프로그램
간단한 C 프로그램으로 시작해봅시다:
#include <stdlib.h>
#include <stdio.h>
#include <string.h>

/**
 * main - uses strdup to create a new string, and prints the
 * address of the new duplcated string
 *
 * Return: EXIT_FAILURE if malloc failed. Otherwise EXIT_SUCCESS
 */
int main(void)
{
    char *s;

    s = strdup("Holberton");
    if (s == NULL)
    {
        fprintf(stderr, "Can't allocate mem with malloc\n");
        return (EXIT_FAILURE);
    }
    printf("%p\n", (void *)s);
    return (EXIT_SUCCESS);
}
strdup
더 나아가기 전에 잠시만 시간을 내어 생각해봅시다. strdup이 "Holberton" 이라는 문자열을 복사하는 것에 대해 어떻게 생각하시나요? 어떻게 검증할 수 있을까요?
.
.
.
strdup은 새로운 문자열을 만들어내야 합니다. 따라서 이 함수는 새로운 문자열을 위한 공간을 예약해야 합니다. strdup은 아마 malloc을 사용할 겁니다. 아! 매뉴얼 페이지에 나와 있군요:
DESCRIPTION
       The  strdup()  function returns a pointer to a new string which is a duplicate of the string s.
       Memory for the new string is obtained with malloc(3), and can be freed with free(3).
아마 낮은 쪽의 주소에 할당될 겁니다(heap이라고 봤었죠). 우리들의 가설을 테스트해보기 위해 컴파일해서 실행시켜 보자고요:
julien@holberton:~/holberton/w/hackthevm0$ gcc -Wall -Wextra -pedantic -Werror main.c -o holberton
julien@holberton:~/holberton/w/hackthevm0$ ./holberton
0x1822010
julien@holberton:~/holberton/w/hackthevm0$
복사된 문자열은 0x1822010 주소에 들어가있습니다. 좋아요. 하지만 이게 low 메모리 주소에 있을까요? 아니면 high 메모리 주소에 있을까요?
한 프로세스의 가상 메모리는 얼마나 클까요?
한 프로세스의 가상 메모리 크기는 시스템 아키텍쳐에 따라 정해집니다. 이 예에서 저는 64비트 머신을 사용했습니다, 따라서 이론상 각 프로세스의 가상 메모리 공간은 2^64 바이트가 됩니다. 이론상의 가능한 가장 높은(the highest) 메모리 주소는 0xffffffffffffffff (1.8446744e+19), 가장 낮은(the lowest) 메모리 주소는 0x0 입니다.
0x1822010은 0xffffffffffffffff과 비교해볼 때 더 작습니다, 따라서 복사된 문자열은 낮은 메모리 주소에 위치해있을 겁니다. 여기서 우리는 /proc 파일시스템을 보는 과정을 통해 이를 검증할 수 있게 됩니다.
proc 파일시스템
man proc에는 다음과 같이 나와있습니다:
The proc filesystem is a pseudo-filesystem which provides an interface to kernel data structures.  It is commonly mounted at `/proc`.  Most of it is read-only, but some files allow kernel variables to be changed.
(proc 파일시스템은 커널 자료 구조와의 인터페이스를 제공하는 가상의 파일 시스템입니다. 이는 보통 `/proc` 경로에 마운트됩니다. 대부분 이 경로는 읽기 전용으로 마운트되는데 일부 파일의 경우 커널 값이 변경될 수 있도록 허용합니다.)
만약 우리가 /proc 경로에 있는 파일 목록을 리스팅한다면 꽤 많은 파일을 볼 수 있을 겁니다. 우리는 개중에서 다음 두 가지를 알아볼 예정입니다:
/proc/[pid]/mem/proc/[pid]/maps
mem
man proc에는 다음과 같이 나와있습니다:
      /proc/[pid]/mem
              This file can be used to access the pages of a process's memory
          through open(2), read(2), and lseek(2).
좋아요! 자 그럼 우리가 아무 프로세스의 모든 가상 메모리에 접근할 수 있고 수정할 수 있을까요?
maps
man proc에는 다음과 같이 나와있습니다:
      /proc/[pid]/maps
              A  file containing the currently mapped memory regions and their access permissions.
          See mmap(2) for some further information about memory mappings.

              The format of the file is:

       address           perms offset  dev   inode       pathname
       00400000-00452000 r-xp 00000000 08:02 173521      /usr/bin/dbus-daemon
       00651000-00652000 r--p 00051000 08:02 173521      /usr/bin/dbus-daemon
       00652000-00655000 rw-p 00052000 08:02 173521      /usr/bin/dbus-daemon
       00e03000-00e24000 rw-p 00000000 00:00 0           [heap]
       00e24000-011f7000 rw-p 00000000 00:00 0           [heap]
       ...
       35b1800000-35b1820000 r-xp 00000000 08:02 135522  /usr/lib64/ld-2.15.so
       35b1a1f000-35b1a20000 r--p 0001f000 08:02 135522  /usr/lib64/ld-2.15.so
       35b1a20000-35b1a21000 rw-p 00020000 08:02 135522  /usr/lib64/ld-2.15.so
       35b1a21000-35b1a22000 rw-p 00000000 00:00 0
       35b1c00000-35b1dac000 r-xp 00000000 08:02 135870  /usr/lib64/libc-2.15.so
       35b1dac000-35b1fac000 ---p 001ac000 08:02 135870  /usr/lib64/libc-2.15.so
       35b1fac000-35b1fb0000 r--p 001ac000 08:02 135870  /usr/lib64/libc-2.15.so
       35b1fb0000-35b1fb2000 rw-p 001b0000 08:02 135870  /usr/lib64/libc-2.15.so
       ...
       f2c6ff8c000-7f2c7078c000 rw-p 00000000 00:00 0    [stack:986]
       ...
       7fffb2c0d000-7fffb2c2e000 rw-p 00000000 00:00 0   [stack]
       7fffb2d48000-7fffb2d49000 r-xp 00000000 00:00 0   [vdso]

              The address field is the address space in the process that the mapping occupies.
          The perms field is a set of permissions:

                   r = read
                   w = write
                   x = execute
                   s = shared
                   p = private (copy on write)

              The offset field is the offset into the file/whatever;
          dev is the device (major:minor); inode is the inode on that device.   0  indicates
              that no inode is associated with the memory region,
          as would be the case with BSS (uninitialized data).

              The  pathname field will usually be the file that is backing the mapping.
          For ELF files, you can easily coordinate with the offset field
              by looking at the Offset field in the ELF program headers (readelf -l).

              There are additional helpful pseudo-paths:

                   [stack]
                          The initial process's (also known as the main thread's) stack.

                   [stack:<tid>] (since Linux 3.4)
                          A thread's stack (where the <tid> is a thread ID).
              It corresponds to the /proc/[pid]/task/[tid]/ path.

                   [vdso] The virtual dynamically linked shared object.

                   [heap] The process's heap.

              If the pathname field is blank, this is an anonymous mapping as obtained via the mmap(2) function.
          There is no easy  way  to  coordinate
              this back to a process's source, short of running it through gdb(1), strace(1), or similar.

              Under Linux 2.0 there is no field giving pathname.
이 내용이 의미하는 바는 실행중인 프로세스의 heap 영역에 접근하기 위해 /proc/[pid]/mem 파일을 보면 된다는 겁니다. 만약 우리가 heap에서 내용을 읽을 수 있다면 수정하기 원하는 문자열이 위치하는 곳을 알아낼 수 있겠죠. 그리고 heap에서 원하는 문자열로 교체할 수도 있게 되고요.
pid
한 프로세스는 한 프로그램의 한 인스턴스이고 독자적인(unique) ID를 갖습니다. PID라 불리는 프로세스 ID는 프로세스가 작동하기 위해, 그리고 프로세스를 조작(manipulate)하기 위해서 사용됩니다.
ps라는 명령어를 통해 실행중인 프로세스의 PID를 가져올 수 있습니다. (man ps)
C 프로그램
이제 실행중인 프로세스에서 원하는 문자열을 heap에서 찾아 같은 길이 또는 더 짧은 다른 문자열로 교체하는 스크립트를 작성해봅시다. 루프를 무한으로 돌면서 중복된 문자열을 계속 찾는 간단한 다음 예제를 통해 확인해봅시다:
#include <stdlib.h>
#include <stdio.h>
#include <string.h>
#include <unistd.h>

/**
 * main - uses strdup to create a new string, loops forever-ever
 *
 * Return: EXIT_FAILURE if malloc failed. Other never returns
 */
int main(void)
{
     char *s;
     unsigned long int i;

     s = strdup("Holberton");
     if (s == NULL)
     {
          fprintf(stderr, "Can't allocate mem with malloc\n");
          return (EXIT_FAILURE);
     }
     i = 0;
     while (s)
     {
          printf("[%lu] %s (%p)\n", i, s, (void *)s);
          sleep(1);
          i++;
     }
     return (EXIT_SUCCESS);
}
위 코드를 컴파일해서 실행하면 다음과 같은 결과가 나오게 됩니다, 그리고 프로세스를 죽이기 전까지 계속해서 루프를 돌게 될겁니다.
julien@holberton:~/holberton/w/hackthevm0$ gcc -Wall -Wextra -pedantic -Werror loop.c -o loop
julien@holberton:~/holberton/w/hackthevm0$ ./loop
[0] Holberton (0xfbd010)
[1] Holberton (0xfbd010)
[2] Holberton (0xfbd010)
[3] Holberton (0xfbd010)
[4] Holberton (0xfbd010)
[5] Holberton (0xfbd010)
[6] Holberton (0xfbd010)
[7] Holberton (0xfbd010)
...
지금까지의 내용을 재밌게 봤다면, 잠시 읽는 것을 중단하고 더 읽기 전에 실행중인 프로세스의 heap 공간에서 문자열을 찾는 스크립트나 프로그램을 짜보세요.
.
.
.
/proc 살펴보기
우리가 만든 loop 프로그램을 돌려봅시다.
julien@holberton:~/holberton/w/hackthevm0$ ./loop
[0] Holberton (0x10ff010)
[1] Holberton (0x10ff010)
[2] Holberton (0x10ff010)
[3] Holberton (0x10ff010)
...
우리가 가장 먼저 찾아야 하는 건 프로세스의 PID입니다.
julien@holberton:~/holberton/w/hackthevm0$ ps aux | grep ./loop | grep -v grep
julien     4618  0.0  0.0   4332   732 pts/14   S+   17:06   0:00 ./loop
위 예제에서의 PID는 4618입니다. (실행할 때마다 이 값은 계속해서 바뀔 수 있습니다, 그리고 직접 시도해본다면 아예 다른 숫자가 나올 겁니다) 결과, 우리가 살펴봐야 하는 maps와 mem 파일은 /proc/4618 경로에 있다는 것을 알 수 있게 되었습니다:
/proc/4618/maps/proc/4618/mem
간단히 디렉토리에서 ls -la 명령을 실행해보면 대충 이런 결과가 나오게 됩니다:
julien@ubuntu:/proc/4618$ ls -la
total 0
dr-xr-xr-x   9 julien julien 0 Mar 15 17:07 .
dr-xr-xr-x 257 root   root   0 Mar 15 10:20 ..
dr-xr-xr-x   2 julien julien 0 Mar 15 17:11 attr
-rw-r--r--   1 julien julien 0 Mar 15 17:11 autogroup
-r--------   1 julien julien 0 Mar 15 17:11 auxv
-r--r--r--   1 julien julien 0 Mar 15 17:11 cgroup
--w-------   1 julien julien 0 Mar 15 17:11 clear_refs
-r--r--r--   1 julien julien 0 Mar 15 17:07 cmdline
-rw-r--r--   1 julien julien 0 Mar 15 17:11 comm
-rw-r--r--   1 julien julien 0 Mar 15 17:11 coredump_filter
-r--r--r--   1 julien julien 0 Mar 15 17:11 cpuset
lrwxrwxrwx   1 julien julien 0 Mar 15 17:11 cwd -> /home/julien/holberton/w/funwthevm
-r--------   1 julien julien 0 Mar 15 17:11 environ
lrwxrwxrwx   1 julien julien 0 Mar 15 17:11 exe -> /home/julien/holberton/w/funwthevm/loop
dr-x------   2 julien julien 0 Mar 15 17:07 fd
dr-x------   2 julien julien 0 Mar 15 17:11 fdinfo
-rw-r--r--   1 julien julien 0 Mar 15 17:11 gid_map
-r--------   1 julien julien 0 Mar 15 17:11 io
-r--r--r--   1 julien julien 0 Mar 15 17:11 limits
-rw-r--r--   1 julien julien 0 Mar 15 17:11 loginuid
dr-x------   2 julien julien 0 Mar 15 17:11 map_files
-r--r--r--   1 julien julien 0 Mar 15 17:11 maps
-rw-------   1 julien julien 0 Mar 15 17:11 mem
-r--r--r--   1 julien julien 0 Mar 15 17:11 mountinfo
-r--r--r--   1 julien julien 0 Mar 15 17:11 mounts
-r--------   1 julien julien 0 Mar 15 17:11 mountstats
dr-xr-xr-x   5 julien julien 0 Mar 15 17:11 net
dr-x--x--x   2 julien julien 0 Mar 15 17:11 ns
-r--r--r--   1 julien julien 0 Mar 15 17:11 numa_maps
-rw-r--r--   1 julien julien 0 Mar 15 17:11 oom_adj
-r--r--r--   1 julien julien 0 Mar 15 17:11 oom_score
-rw-r--r--   1 julien julien 0 Mar 15 17:11 oom_score_adj
-r--------   1 julien julien 0 Mar 15 17:11 pagemap
-r--------   1 julien julien 0 Mar 15 17:11 personality
-rw-r--r--   1 julien julien 0 Mar 15 17:11 projid_map
lrwxrwxrwx   1 julien julien 0 Mar 15 17:11 root -> /
-rw-r--r--   1 julien julien 0 Mar 15 17:11 sched
-r--r--r--   1 julien julien 0 Mar 15 17:11 schedstat
-r--r--r--   1 julien julien 0 Mar 15 17:11 sessionid
-rw-r--r--   1 julien julien 0 Mar 15 17:11 setgroups
-r--r--r--   1 julien julien 0 Mar 15 17:11 smaps
-r--------   1 julien julien 0 Mar 15 17:11 stack
-r--r--r--   1 julien julien 0 Mar 15 17:07 stat
-r--r--r--   1 julien julien 0 Mar 15 17:11 statm
-r--r--r--   1 julien julien 0 Mar 15 17:07 status
-r--------   1 julien julien 0 Mar 15 17:11 syscall
dr-xr-xr-x   3 julien julien 0 Mar 15 17:11 task
-r--r--r--   1 julien julien 0 Mar 15 17:11 timers
-rw-r--r--   1 julien julien 0 Mar 15 17:11 uid_map
-r--r--r--   1 julien julien 0 Mar 15 17:11 wchan
/proc/pid/maps
앞에서 보았듯 /proc/pid/maps 파일은 텍스트 파일이기 때문에 이를 직접 읽어 확인할 수 있습니다. 실행한 프로세스 maps 파일의 내용은 이렇게 생겼네요:
julien@ubuntu:/proc/4618$ cat maps
00400000-00401000 r-xp 00000000 08:01 1070052                            /home/julien/holberton/w/funwthevm/loop
00600000-00601000 r--p 00000000 08:01 1070052                            /home/julien/holberton/w/funwthevm/loop
00601000-00602000 rw-p 00001000 08:01 1070052                            /home/julien/holberton/w/funwthevm/loop
010ff000-01120000 rw-p 00000000 00:00 0                                  [heap]
7f144c052000-7f144c20c000 r-xp 00000000 08:01 136253                     /lib/x86_64-linux-gnu/libc-2.19.so
7f144c20c000-7f144c40c000 ---p 001ba000 08:01 136253                     /lib/x86_64-linux-gnu/libc-2.19.so
7f144c40c000-7f144c410000 r--p 001ba000 08:01 136253                     /lib/x86_64-linux-gnu/libc-2.19.so
7f144c410000-7f144c412000 rw-p 001be000 08:01 136253                     /lib/x86_64-linux-gnu/libc-2.19.so
7f144c412000-7f144c417000 rw-p 00000000 00:00 0
7f144c417000-7f144c43a000 r-xp 00000000 08:01 136229                     /lib/x86_64-linux-gnu/ld-2.19.so
7f144c61e000-7f144c621000 rw-p 00000000 00:00 0
7f144c636000-7f144c639000 rw-p 00000000 00:00 0
7f144c639000-7f144c63a000 r--p 00022000 08:01 136229                     /lib/x86_64-linux-gnu/ld-2.19.so
7f144c63a000-7f144c63b000 rw-p 00023000 08:01 136229                     /lib/x86_64-linux-gnu/ld-2.19.so
7f144c63b000-7f144c63c000 rw-p 00000000 00:00 0
7ffc94272000-7ffc94293000 rw-p 00000000 00:00 0                          [stack]
7ffc9435e000-7ffc94360000 r--p 00000000 00:00 0                          [vvar]
7ffc94360000-7ffc94362000 r-xp 00000000 00:00 0                          [vdso]
ffffffffff600000-ffffffffff601000 r-xp 00000000 00:00 0                  [vsyscall]
앞에서 봤던 내용을 새겨봅시다. stack은 high 메모리 공간에 존재하고 heap은 낮은 메모리 공간에 존재한다고 했습니다.
heap
maps 파일을 이용해 우리는 우리가 찾는 문자열이 있는 곳을 찾아냈습니다:
010ff000-01120000 rw-p 00000000 00:00 0 [heap]
여기서 heap은:
- 프로세스 가상 메모리에서
0x010ff000주소로 시작합니다. 0x01120000주소로 끝납니다.- 읽고 쓸 수 있습니다. (
rw)
잠시 (아직 돌고있는) loop 프로그램을 살펴봅시다:
...
[1024] Holberton (0x10ff010)
...
-> 0x010ff000 < 0x10ff010 < 0x01120000. 이 내용은 우리가 찾는 문자열이 heap에 있다는 것을 확인시켜줬습니다. 더 명확하게 이 문자열은 heap의 0x10 인덱스에 존재합니다. 만약 우리가 /proc/pid/mem/ 파일(이 예에선 /proc/4618/mem)을 열어 0x10ff010 주소가 위치하는 곳으로 이동하면, 실행중인 프로세스의 heap 공간에 존재하는 "Holberton" 문자열을 덮어씌울 수 있을 겁니다.
자 이제 이것을 하는 스크립트를 짜보자고요. 가장 좋아하는 언어를 골라 해보세요!
지금까지의 내용을 재밌게 봤다면, 잠시 읽는 것을 중단하고 더 읽기 전에 실행중인 프로세스의 heap 공간에서 원하는 문자열을 찾는 스크립트나 프로그램을 짜봅시다. 다음 문단에서 답을 드리겠습니다.
.
.
.
가상 메모리에서 문자열 덮어씌우기
이제 Python 3를 이용해 이 작업을 해보겠습니다. 아, 꼭 Python일 필요는 없습니다 원하는 언어로 하셔도 됩니다. 여기 코드가 있습니다:
#!/usr/bin/env python3
'''
Locates and replaces the first occurrence of a string in the heap
of a process

Usage: ./read_write_heap.py PID search_string replace_by_string
Where:
- PID is the pid of the target process
- search_string is the ASCII string you are looking to overwrite
- replace_by_string is the ASCII string you want to replace
  search_string with
'''

import sys

def print_usage_and_exit():
    print('Usage: {} pid search write'.format(sys.argv[0]))
    sys.exit(1)

# check usage
if len(sys.argv) != 4:
    print_usage_and_exit()

# get the pid from args
pid = int(sys.argv[1])
if pid <= 0:
    print_usage_and_exit()
search_string = str(sys.argv[2])
if search_string  == "":
    print_usage_and_exit()
write_string = str(sys.argv[3])
if search_string  == "":
    print_usage_and_exit()

# open the maps and mem files of the process
maps_filename = "/proc/{}/maps".format(pid)
print("[*] maps: {}".format(maps_filename))
mem_filename = "/proc/{}/mem".format(pid)
print("[*] mem: {}".format(mem_filename))

# try opening the maps file
try:
    maps_file = open('/proc/{}/maps'.format(pid), 'r')
except IOError as e:
    print("[ERROR] Can not open file {}:".format(maps_filename))
    print("        I/O error({}): {}".format(e.errno, e.strerror))
    sys.exit(1)

for line in maps_file:
    sline = line.split(' ')
    # check if we found the heap
    if sline[-1][:-1] != "[heap]":
        continue
    print("[*] Found [heap]:")

    # parse line
    addr = sline[0]
    perm = sline[1]
    offset = sline[2]
    device = sline[3]
    inode = sline[4]
    pathname = sline[-1][:-1]
    print("\tpathname = {}".format(pathname))
    print("\taddresses = {}".format(addr))
    print("\tpermisions = {}".format(perm))
    print("\toffset = {}".format(offset))
    print("\tinode = {}".format(inode))

    # check if there is read and write permission
    if perm[0] != 'r' or perm[1] != 'w':
        print("[*] {} does not have read/write permission".format(pathname))
        maps_file.close()
        exit(0)

    # get start and end of the heap in the virtual memory
    addr = addr.split("-")
    if len(addr) != 2: # never trust anyone, not even your OS :)
        print("[*] Wrong addr format")
        maps_file.close()
        exit(1)
    addr_start = int(addr[0], 16)
    addr_end = int(addr[1], 16)
    print("\tAddr start [{:x}] | end [{:x}]".format(addr_start, addr_end))

    # open and read mem
    try:
        mem_file = open(mem_filename, 'rb+')
    except IOError as e:
        print("[ERROR] Can not open file {}:".format(mem_filename))
        print("        I/O error({}): {}".format(e.errno, e.strerror))
        maps_file.close()
        exit(1)

    # read heap
    mem_file.seek(addr_start)
    heap = mem_file.read(addr_end - addr_start)

    # find string
    try:
        i = heap.index(bytes(search_string, "ASCII"))
    except Exception:
        print("Can't find '{}'".format(search_string))
        maps_file.close()
        mem_file.close()
        exit(0)
    print("[*] Found '{}' at {:x}".format(search_string, i))

    # write the new string
    print("[*] Writing '{}' at {:x}".format(write_string, addr_start + i))
    mem_file.seek(addr_start + i)
    mem_file.write(bytes(write_string, "ASCII"))

    # close files
    maps_file.close()
    mem_file.close()

    # there is only one heap in our example
    break
Note: 이 스크립트는 반드시 root 권한으로 실행시켜야 합니다, 그렇지 않으면 실행한 사용자가 프로세스의 owner더라도 /proc/pid/mem 파일을 읽거나 쓸 수 없습니다.
스크립트 실행하기
julien@holberton:~/holberton/w/hackthevm0$ sudo ./read_write_heap.py 4618 Holberton "Fun w vm!"
[*] maps: /proc/4618/maps
[*] mem: /proc/4618/mem
[*] Found [heap]:
    pathname = [heap]
    addresses = 010ff000-01120000
    permisions = rw-p
    offset = 00000000
    inode = 0
    Addr start [10ff000] | end [1120000]
[*] Found 'Holberton' at 10
[*] Writing 'Fun w vm!' at 10ff010
julien@holberton:~/holberton/w/hackthevm0$
여기서 메모리 주소는 우리가 앞서 수동으로 찾았던 메모리 주소와 일치합니다:
- 실행중인 프로세스에서 heap 영역은
0x010ff000부터0x01120000까지 존재합니다. - 우리가 찾던 문자열은 heap의
0x10인덱스에 있습니다, 따라서0x10ff010겠죠.
이제 다시 loop 프로그램으로 돌아가보면 "fun w vm!"을 출력하고 있을 겁니다:
...
[2676] Holberton (0x10ff010)
[2677] Holberton (0x10ff010)
[2678] Holberton (0x10ff010)
[2679] Holberton (0x10ff010)
[2680] Holberton (0x10ff010)
[2681] Holberton (0x10ff010)
[2682] Fun w vm! (0x10ff010)
[2683] Fun w vm! (0x10ff010)
[2684] Fun w vm! (0x10ff010)
[2685] Fun w vm! (0x10ff010)
...
마치며
예제 파일
이 글에 있는 예제 파일은 이 레포에 올라가 있습니다.
다음은?
다음 글에서는 비슷한 일을 할겁니다, 하지만 이 글과는 다르게 돌고 있는 Python 3 스크립트 프로세스의 메모리에 접근할 예정입니다. 이는 여기서 한 일과는 다르게 쉬운 일이 아닙니다. 이를 통해 Python 3 내부를 약간 살펴볼 수 있겠죠. 궁금하다면 직접 한 번 해보세요! 그리고 레포에 있는 read_write_heap.py 파일이 왜 Python 3 ASCII 문자열을 수정하는 데에는 작동하지 않는지 알아내보시기 바랍니다.
다음 글에서 봅시다! Happy Hacking!